


|
|
|
|
previous: Home next: User Guide
The following instructions provide a walk-through for setting up SwissQM and the TinyOS (tmote sky, telosb platform) and Eclipse programming environment on Ubuntu Linux. They have been tested on Hardy Heron. The complete installation is also available as a VMware image that can be run by the free VMware player.
Add the following packages, for example through aptitude.
Add the following to your ~/.bashrc.
export JAVA_HOME=<to the directory that contains the JDK>
# e.g.
# export JAVA_HOME=/usr/lib/jvm/java-1.5.0-sun
export TOSROOT=/home/<user>/TinyOS/tinyos-2.x
export TOSDIR=$TOSROOT/tos
export CLASSPATH=$TOSROOT/support/sdk/java/tinyos.jar:.:$CLASSPATH
export MAKERULES=$TOSROOT/support/make/Makerules
export PATH=/usr/local/msp430/bin:/home/<user>/maven/bin:$PATH
Make sure that you either reopen the shell or do a "source ~/.bashrc.
Build the msp430-gcc using the mspgcc build script from
the CVS source distribution of TinyOS 1.x. You only need to check out this
script, not the entire TinyOS 1.x tree.
$ cd
$ mkdir TinyOS
$ cd TinyOS
$ cvs -d:pserver:anonymous@tinyos.cvs.sourceforge.net:/cvsroot/tinyos login
$ cvs -z3 -d:pserver:anonymous@tinyos.cvs.sourceforge.net:/cvsroot/tinyos co -P tinyos-1.x/tools/src/mspgcc
Run the script. The installation directory is set by the INSTALL_DIR
variable.
$ sudo bash
# cd tinyos-1.x/tools/src/mspgcc
# INSTALL_DIR=/usr/local/msp430 ./build-mspgcc install
< ... wait ... >
# exit
Check whether the compiler you just built still has the bug that prevents SwissQM from being compiled.
$ echo "unsigned long long int foo(unsigned char x) { return x; }" > foo.c
$ msp430-gcc -c foo.c
If you receive a segmentation fault you need to patch the compiler:
foo.c: In function `foo':
foo.c:1: internal error: Segmentation fault
Please submit a full bug report,
with preprocessed source if appropriate.
See <URL:http://gcc.gnu.org/bugs.html> for instructions.
Patch the compiler using the mspgcc430-segfault.patch. Download the patch and apply it.
# cd ~<user>/TinyOS/tinyos-1.x/tools/src/mspgcc/build
# patch -p0 < ~<user>/TinyOS/mspgcc430-segfault.patch
# cd gcc-3.2.3-obj
# make install
Verify that bug was fixed by recompiling foo.c.
At the time of writing the CVS source tree of TinyOS 2.x go so bloated that it no longer fits together with SwissQM into the 48 kB flash of the tmote sky node. However, the latest release TinyOS 2.0.2-2 works. This is the version you are going to install. Unfortunately, it only comes as RPM which first needs to be extracted.
$ cd ~/TinyOS
$ wget http://www.tinyos.net/dist-2.0.0/tinyos/linux/tinyos-2.0.2-2.noarch.rpm
$ rpm2cpio tinyos-2.0.2-2.noarch.rpm | cpio -idv
$ mv opt/tinyos-2.x .
$ rmdir opt
$ rm tinyos-2.0.2-2.noarch.rpm
Now, get the TinyOS Tools and NesC compiler the same way.
$ wget http://www.tinyos.net/dist-2.0.0/tinyos/linux/tinyos-tools-1.2.4-3.i386.rpm
$ wget http://www.tinyos.net/dist-1.2.0/tinyos/linux/nesc-1.2.8a-1.i386.rpm
$ sudo bash
# cd /
# rpm2cpio ~<user>/TinyOS/tinyos-tools-1.2.4-3.i386.rpm | cpio -idv
# rpm2cpio ~<user>/TinyOS/nesc-1.2.8a-1.i386.rpm | cpio -idv
# exit
$ rm tinyos-tools-1.2.4-3.i386.rpm
$ rm nesc-1.2.8a-1.i386.rpm
Download the source tarball of SwissQM
SwissQM-TinyOS-2.0.2-1.0.tar.bz2 and untar it into the directory $TOSROOT, i.e.,
the top-level directory of the TinyOS distribution installed in the previous step.
SwissQM is compiled as follows
$ cd $TOSROOT/apps/SwissQM
$ make telosb
Connect a sensor node that is going to be root node and flash SwissQM onto it. You
can check the USB-ID and the device file names using the motelist tool.
$ make telosb install,0 bsl,/dev/ttyUSB0
You should now have blue blinking node, which indicates the global time sync beat.
Download the Maven binary (apache-maven-2.0.9) from maven.apache.org and untar it.
$ cd ~
$ tar xfj apache-maven-2.0.9-bin.tar.bz2
$ mv apache-maven maven
Check that it works by running in any directory:
$ mvn -version
Maven version: 2.0.9
Java version: 1.5.0_15
OS name: "linux" version: "2.6.24-17-generic" arch: "i386" Family: "unix"
Install the full eclipse tarball from eclipse.org. It is important that you get the Eclipse Classic 3.3.2 tarball which already contains almost all features. Untar it and start Eclipse.
$ tar xfz eclipse-SDK-3.3.2-linux-gtk.tar.gz -C ~
$ cd ~/eclipse
$ ./eclipse
Select Help → Software Updates → Find and Install
→ Search for New Features to Install → click Next
→ New Remote Site. Add the URLhttp://m2eclipse.sonatype.org/update/.
Click Finish and select Maven Integration for Eclipse and install it.
For R-OSGi the sources are retrieved by subversion. In this step the
corresponding Eclipse plug-in installed.
Select Help → Software Updates → Find and Install
→ Search for New Features to Install → click Next
→ New Remote Site. Add the URLhttp://subclipse.tigris.org/update_1.2.x.
Click Finish and select Subclipse 1.2.4 and install it.
Select Help → Software Updates → Find and Install → Search for New Features to Install → click Next → Select Europa Discovery Site → click Finish. Now, choose the following packages:
Click on the Select Required button to resolve the missing dependencies. Install the extensions.
Switch to the SVN repository view and add a new repository location.
Add https://r-osgi.svn.sourceforge.net/svnroot/r-osgi.
Check out the R-OSGi as a project in the workspace from the SVN trunk.
Download gateway sources SwissQM-osgi-gateway-2.0.0.tar.gz2.
Import the project from this archive into Eclipse as follows:
Select File → Import → General →
Existing Projects into Workspace. Choose archive file:
SwissQM-osgi-gateway-2.0.0.tar.gz. It is important that you
deselect the two projects ch.ethz.iks.swissqm.core
and ch.ethz.iks.swissqm.plugin and only import
SwissQM-osgi-gateway. The other two are nested projects,
they are added later on, but without copying the content to a new
project workspace. Click Finish to import the project.
Note: There many warnings in Eclipse about the projects, we resolve them shortly.
Build the R-OSGi project with maven. When you first launch maven it needs to download all dependencies which can take a minute or two.
   $ cd ~/workspace
   $ cd R-OSGi
   $ mvn install
Build the SwissQM Gateway application with maven.
   $ cd ~/workspace
   $ cd SwissQM-osgi-gateway
   $ mvn install
Now, switch back to Eclipse in order to get rid of the errors and warnings. This is now a bit of magic as the Eclipse maven plugin is still extremely buggy. The gateway was already built (by maven from the command line) we know that there cannot be any error in the sources (except the Eclipse plug-in sources which are not built by maven). What usually works are the following steps to get rid of the errors.
Repeat these steps for both Projects R-OSGi and SwissQM until no further warnings are shown.
The SwissQM gateway is started separate from the Eclipse plugin.
It is launched through the Concierge OSGi Container
from the run directory. The startup configuration can
modified in the init.xargs but should be fine for
the moment. Also, SwissQM's MoteDB that contains a mapping from
USB IDs to TinyOS node IDs needs to be adapted such that
TinyOS ID 0 maps to the USB-ID of the node that was programmed in
step 3. The gateway will detect when a new device is connected and
identify it based on its USB-ID. Note: it only registers a Mote
Service when the new device is recognised as a root node, i.d.,
having TinyOS ID 0. Hence, modify the line M4AIZEJU=0 in
run/motedb.properties such that it is equal
to the ID of the node programmed in step 3. Use motelist
to display all connected nodes. Then start the gateway:
$ java -jar concierge-1.0.0.RC2.jar
Concierge and SwissQM then should have started. The interactive shell is started too. First check the output whether the mote device was properly recognised. It announces it as:
[DEBUG] scanning for existing devices...
[Tue Jun 03 16:44:22 CEST 2008] [INFO] new node 'M4AIZEJU' connected at device '/dev/ttyUSB0'
serial@/dev/ttyUSB0:115200: resynchronising
[Tue Jun 03 16:44:22 CEST 2008] [DEBUG] MoteDeviceObservationService registered.
Type help in the shell to get some information
about possible commands. Examples:
Concierge> qm.reset all sends a reset command to all nodesConcierge> qm.led all 7 7 turns on all LEDs of all nodesConcierge> qm.led 0 7 1 turns on only the red LED of node 0Concierge> swissqm.query "SELECT nodeid, light FROM SENSORS SAMPLE PERIOD 5s"
submits a queryConcierge> bundles shows all bundles currently installed (including the
query bundles) Concierge> uninstall 22 uninstall bundle 22 (if bundle 22 is a query bundle
the query will be stopped)Leave the gateway running. It is needed in 8.3.
The Eclipse plugin requires importing the following tree projects. The projects are nested in R-OSGi (remote) and SwissQM (plugin and core). Import them as follows:
ch.ethz.r_osgi.remote:
Select File → Import → General →
Existing Projects into Workspace → Click Next →
Choose root directory: workspace/R-OSGi/remote. Important:
Deselect Copy projects into workspace as we are do not want
to duplicate the project content. → Click Finish.
ch.ethz.swissqm.core:
Select File → Import → General →
Existing Projects into Workspace → Click Next →
Choose root directory: workspace/SwissQM-osgi-gateway/core. Important:
Deselect Copy projects into workspace as we are do not want
to duplicate the project content. → Click Finish.
ch.ethz.swissqm.plugin:
Select File → Import → General →
Existing Projects into Workspace → Click Next →
Choose root directory: workspace/SwissQM-osgi-gateway/plugin. Important:
Deselect Copy projects into workspace as we are do not want
to duplicate the project content. → Click Finish.
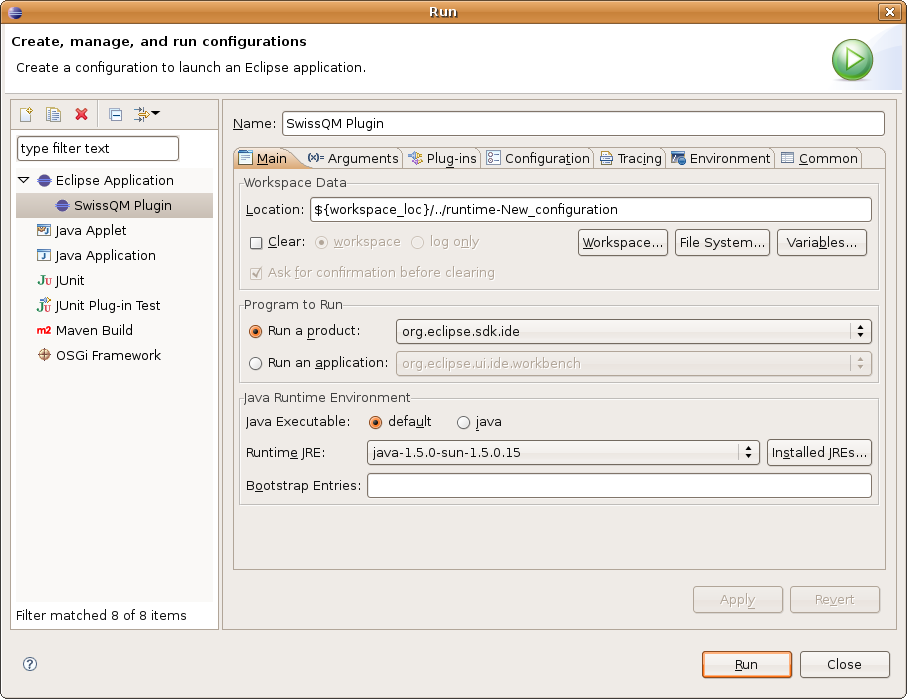
Create new run configuration to start the plugin.
Select Run → Open Run Dialog... → Double-click on Eclipse Application. Set the main tab as follows. Basically, give it a name.
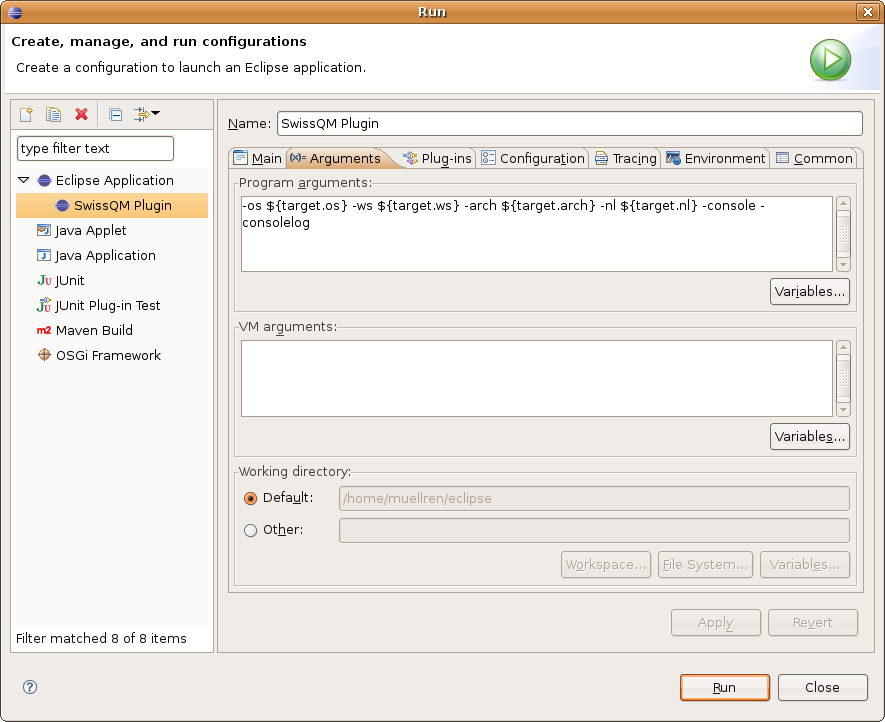
Switch to the arguments tab and add -console -consolelog to the
program arguments, such that we get Eclipse Equinox console.
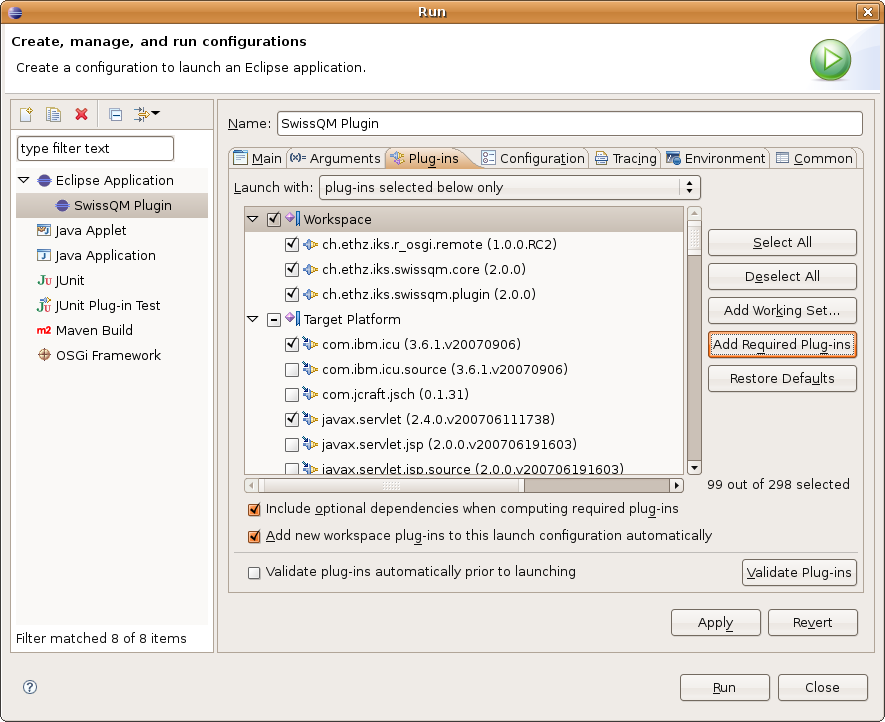
Switch to the Plug-ins tab and deselect all, then select the three workspace plug-ins. Then click the Add Required Plug-ins button the enable the remaining plug-ins. Make sure the Equinox Event Plugin got selected.
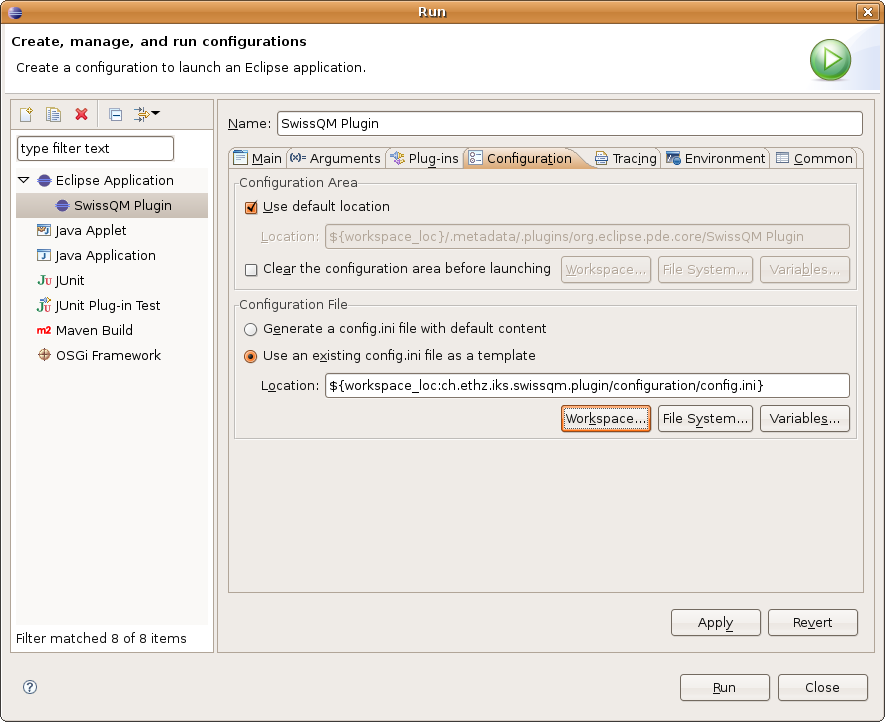
Switch to the Configuration tab select the existing config.ini from
the workspace ch.ethz.iks.siwssqm.plugin/configuration/config.ini.
The remaining tabs should be fine, just click Apply and then Run.
If not already running start the plugin using the run configuration just created. Open the SwissQM Perspective. Window → Open Perspective → Other... → SwissQM Perspective.
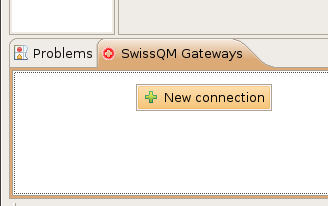
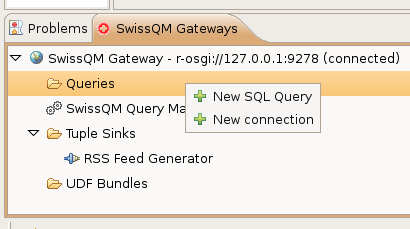
Open the SwissQM Gateways tab → right-click and choose New Connection.
Enter r-osg://127.0.0.1:9278. That is the R-OSGi URL to the
device that runs the SwissQM gateway. Connect to the gateway by double-clicking
on the new entry in the SwissQM Gateways. The view shows now the connected
gateway.
You can submit queries to this gateway (right click: new query) or install UDFs by dragging them onto the gateway. Note: A UDF must be installed first before it can be used in a query.
previous: Home next: User Guide
Last update: June 2nd, 2008